![that destination from [our] conversation](https://blogger.googleusercontent.com/img/b/R29vZ2xl/AVvXsEi5-n4tBCnwKdDjQjLTzOSaJ28jrO-n4Em9oR2kW7-FQL2Bd1jtyW9zQ31gO9AuCnu4h3v5JRq2ka7oEr_GGfKNKnl-ifB0yeE5ize_hPPT3jFK_g59SBQP0Anrexu2K_5jjz0yUKT0JR68/s1600/gwr2.jpg)
Monday, December 22, 2014


Thursday, December 11, 2014
Tuesday, December 2, 2014
Friday, October 3, 2014
Sunday, September 7, 2014
Thursday, June 26, 2014
LESS KEVIN=LESS STRESS
Resetting the Windows administrator’s password or Linux root account
password is a common troubleshooting practice when faced with systems
infected with mailware, data corruption, and system recoveries. This
article does not prompt malicious use, but instead stress the point that
an account password does not protect your data.
In principle, passwords are stored locally, anything stored locally can be obtained and modified by slaving that physical data. For example, a hard drive can be removed, added to a different computer already running it’s own OS. That drive will now show up as a slave drive and the contents easily accessible. The following tutorial does not use any third party tools, and only relies on the initial media used to install the OS.

The following two sceniors make use of the Window Installation Disk.
Windows 7 32-bit Professional Installation Disc
**md5
Windows 7 64-bit Professional Installation Disc
**md5
In principle, passwords are stored locally, anything stored locally can be obtained and modified by slaving that physical data. For example, a hard drive can be removed, added to a different computer already running it’s own OS. That drive will now show up as a slave drive and the contents easily accessible. The following tutorial does not use any third party tools, and only relies on the initial media used to install the OS.
- Resetting Stock Windows Administrator password using Installation Disc
- Resetting Non-Stock Administrator Password using Windows Installation Disc
- Resetting Linux Root Password using Single User Mode
Resetting Stock Windows Administrator password using Installation Disc
This method will only work if you have not touched the stock Administrator account that comes with a fresh install of windows 7. By default the Administrator account with a blank password and disabled. In this method we will take advantage of this by enabling the Administrator account via the registry. If you set the built-in Administrator account for your Windows rollouts or your home Windows machines I give you kudos for being a smart user and follow best practices in locking down your computer. However it does add an extra step in resetting the Administrator’s password. But, No problem!The following two sceniors make use of the Window Installation Disk.
Windows 7 32-bit Professional Installation Disc
**md5
Windows 7 64-bit Professional Installation Disc
**md5
- Boot into your Windows Installation Disk
- Click Next, and wait for Recovery to scan for Windows OS’s
- Click the Windows OS you want and click next. This will bring you to the Recovery Options list. Click command prompt.
- Once command prompt opens, type regedit
- Regedit will open, click on HKLM, then click File –> Load Hive
- Now we need to navigate to the system SAM file located usually D:\Windows\System32\config\SAM
,since C: is the reserved partition Windows 7 makes. If this is not the
case you will have to use diskpart on the command line to figure out
which drive letter to use.
- Give the Loaded Hive a name, this can be anything. I named my testReset. It will now show up in the Registry list.
- In this new Hive List, browse to {testReset} –> SAM –> Domains –> Account –> Users –> 000001F4 and modify the Key F4
- Locate the hex 11 bit and change it to 10 and click OK to activiate the stock administrator account that is currently disabled.
- Restart the system and you should see the Administrator account at the Login Prompt.
- Log into the Administrator and use Computer Management to set the password of your account.


Resetting Non-Stock Administrator Password using Windows Installation Disc
- Repeat Steps 1-4 from the first method.
- We need to load a Registry Hive from the system we are trying to
reset the password for. In this case SYSTEM instead of SAM, located D:\windows\system32\config\SYSTEM
,since C: is the reserved partition Windows 7 makes. If this is not the
case you will have to use diskpart on the command line to figure out
which drive letter to use.
- Navigate to the Registry key SetupType located under testReset –>
Setup –> SetupType. Modify this DWORD value from 0 to 2 and click OK
NOTICE: A value of 2 will run the value located in the CMDLine registry key. Value 0 =does nothing and shows the login screen at boot. Value 1 = Runs the value located in CMDLine registry key, but then Restarts. - Edit the registry value of CMDLine
- Unload the tesetReset Hive. Click on testReset then click File –> Unload Hive.
- Restart the system, you will be preseted with the following command prompt
- Now set the Administrator Password via the syntax net user Administrator {passwd}
- Type exit, and you should be preseted with the Login Screen. Try the password you just set!!!


Resetting Linux Root Password using Single User Mode
- Reset the system and enter editor mode of your Boot loader. In my case Grub. Select the boot line and hit ‘e’
- Find the Linux/Kernel Line:
- Add single init=/bin/bash to the end of the kernel or linux line(depends on your version.
- Boot the changes we just made. In my case and version of grub F10
boots the changes, check with your boot loader, it should be written at
the bottom of the editor.
As you can see we are dropped into a read only root shell.
If you try to reset the password now you will recieve this error:
- The filesystem will be set in read only mode, which does not allow
us to manipulate the password user file. To remedy do the following to
mount the volume as read/write
- Verify
Now restart the system and try to log in as root with the passowrd you just set


Thoughts
I hope this article is both helpful and informative. We can see from this article that physical security (the ability to physically obtain) your data is very important. Regardless of the password strenght you choose. There are also preventative measures to take in tadmen with a strong password. Some preventative measures we can utlize are are free are:- Windows users can use BitLocker, a free drive encryption software built into windows to prevent a third party or bootable media obtaining or modifying the password file.(SAM file).
- Windows users can use TrueCrypt, a OpenSource drive encryiption software.
- Linux users can encrypt GRUB, see this artile.
- Linux users can also use open source drive encryption to prevent third party or bootable media from obtaining or modifying the password file.(/etc/passwd)
Sunday, May 4, 2014

Monday, April 21, 2014
Monday, February 24, 2014
Tuesday, July 9, 2013
Things were working fine, and then i wanted to read the help and support docs....
Then i got this, which isn't entirely my fault
 and now I'm like o_0
Sunday, June 16, 2013
Wednesday, June 12, 2013
Win8 Collection HTML Files
Thursday, May 23, 2013
So small now
Reposted from RasberryPi on blogger over here...
Installing the Raspberry Pi Camera Module - Part 1
Ok, so lets have a look at what you get for your hard earned cash. The ruler is included in the photos to give an idea of scale. The actual camera is tiny and is mounted on a board which is only about 25mm x 25mm:

The camera board comes with a pre-fitted ribbon cable which is about 15 cm long. The following photos show front and back views of the complete assembly as supplied.


Unfortunately the camera module isn't quite "plug and play" and there are a few preparatory tasks to perform before before it can be used with the Raspberry Pi.
First of all you need to download the latest release of the Raspbian "Wheezy" operating system from www.raspberrypi.org and install it on a freshly formatted SD(HC) memory card (4GB or larger). At the time of writing the most recent release is dated 2013-02-09. I've covered in detail how to make a bootable SD(HC) card in a previous post so I won't repeat it here.
The first time you boot from this new SD(HC) card "Raspi-config" will run automatically. Use the "expand_rootfs" option to expand the root partition on the SD(HC) card to use all the available space (how to do this is covered in detail in a previous post).
Now choose the "memory_split" option and press Enter:

This option allows you to specify how much memory to allocate to the graphics processor. Type in "128" and press Enter:
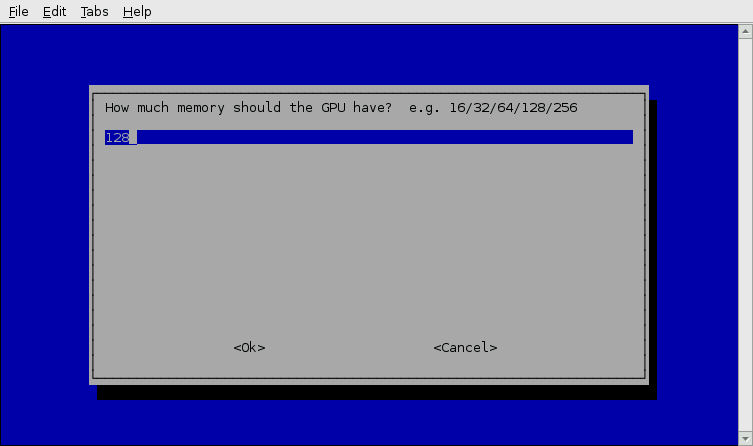
Now select "Finish" and allow your Raspberry Pi to reboot. Then log in and run the "sudo apt-get update" and "sudo apt-get upgrade" commands. Details of how to do this can be found here if you need them.
Let your Raspberry Pi reboot and then run the "Raspi-config" commmand again by typing "sudo raspi-config" at the command line prompt and pressing Enter:
pi@raspberrypi ~ $ sudo raspi-config_
There should now be an option to enable camera support. Use the arrow keys to move down to the "camera" command and press Enter:

Select "Enable" and press Enter:

When you return to the Raspi-config main screen select the "Finish" option and then reboot your Raspberry Pi.
Your Raspberry Pi should now be ready for the camera module, but just to be sure, go into the GUI, launch "Leafpad" and open the file "/boot/config.txt". Scroll down to the bottom of the file - the last few lines in the file should contain the entries "gpu_mem=128", "start_file=start_x.elf" and "fixup_file=fixup_x.dat" as shown in the following screenshot.

In my next post I'll explain how to connect the camera module to the Raspberry Pi and get it up and running.
Monday, May 20, 2013
Why not to USB/Hotspot Tether your MetroPCS Android Phone(s)
This is just a guide I decided to write to warn those of you who
Tether your MetroPCS phones and I know there are alot of you out there.
Your Android phone is yours to begin with. Do whatever you want with
it.. such as root it, flash roms on it, whatever to get a better, richer
experience on it as Android is open source and you should be allowed to
use your phone to its full potential.
MetroPCS cant do anything about you rooting and modifying your phone, the only thing they can do is void your warranty, but all you need to do is just flash the stock rom back on it and your all safe if your in a situation where you need to take the phone back to them.
Now to begin with the main part, DO NOT use Tethering apps that allow you to use your phone's internet connection on other devices because your MetroPCS account can be easily terminated if they find out, and there has been many cases where customers have had their MetroPCS service cancelled due to MetroPCS finding out about them tethering their phones. Look no further, its right in their terms which im sure 99% of you never looked at:
MetroPCS | MetroWEB | Terms of Use

Not only do they cancel your service, your phone's ESN gets blacklisted so it is unable to be used again on the MetroPCS network. So say you try to sell your phone to someone, that person wont be able to activate the phone on MetroPCS and people usually steer clear of phones with bad ESN's unless they knowingly buy it with a bad ESN.
Tethering your phone is really not worth it, just get a cheap Internet connection. If you can afford an Android phone and pay $50+ monthly on your phone plan(s) than im sure you have enough money in your wallet to pay for a cheap Internet Connection. Of course you don't have to listen to anything I have said just remember that this does happen and I made this Article to make you all aware of it. Feel free to share this article but please give me credit and linkback to this thread.
MetroPCS cant do anything about you rooting and modifying your phone, the only thing they can do is void your warranty, but all you need to do is just flash the stock rom back on it and your all safe if your in a situation where you need to take the phone back to them.
Now to begin with the main part, DO NOT use Tethering apps that allow you to use your phone's internet connection on other devices because your MetroPCS account can be easily terminated if they find out, and there has been many cases where customers have had their MetroPCS service cancelled due to MetroPCS finding out about them tethering their phones. Look no further, its right in their terms which im sure 99% of you never looked at:
MetroPCS | MetroWEB | Terms of Use
Not only do they cancel your service, your phone's ESN gets blacklisted so it is unable to be used again on the MetroPCS network. So say you try to sell your phone to someone, that person wont be able to activate the phone on MetroPCS and people usually steer clear of phones with bad ESN's unless they knowingly buy it with a bad ESN.
Tethering your phone is really not worth it, just get a cheap Internet connection. If you can afford an Android phone and pay $50+ monthly on your phone plan(s) than im sure you have enough money in your wallet to pay for a cheap Internet Connection. Of course you don't have to listen to anything I have said just remember that this does happen and I made this Article to make you all aware of it. Feel free to share this article but please give me credit and linkback to this thread.
What app do you guys use to enable hotspot on metropcs?
1. Install FoxFi & the proxy plugin on your phone. This sets up a
wifi hotspot but which also hides the tethering. You then manually setup
up a wifi connection profile on the PB & when you want to use it
you just switch to that profile. You are then online, and also hidden
from tether use.
2. You do the same through bluetooth after installing either BlueDUN or PDANet onto your Android. You activate the app on your phone then activate Internet tethering on your PB- selecting your network profile. You will be warned about charges, etc. However both BlueDUN and PDANet again have the same principle - to allow data connection use from your phone whilst 'hiding' you from tether charges. BlueDUN is better (but has cost); PDANet is free.
I do use both ways. It may sound more complicated but the Wifi hotspot using FoxFi is the easiest way. Once setup you simply activate FoxFi, change your Wifi setting on PB & hey presto - you're online with data. I used this last week through my Galaxy Ace to do a video call from a coffee shop - worked superbly!
2. You do the same through bluetooth after installing either BlueDUN or PDANet onto your Android. You activate the app on your phone then activate Internet tethering on your PB- selecting your network profile. You will be warned about charges, etc. However both BlueDUN and PDANet again have the same principle - to allow data connection use from your phone whilst 'hiding' you from tether charges. BlueDUN is better (but has cost); PDANet is free.
I do use both ways. It may sound more complicated but the Wifi hotspot using FoxFi is the easiest way. Once setup you simply activate FoxFi, change your Wifi setting on PB & hey presto - you're online with data. I used this last week through my Galaxy Ace to do a video call from a coffee shop - worked superbly!
Tuesday, October 23, 2012
Friday, September 28, 2012
Tuesday, April 12, 2011


Subscribe to:
Posts (Atom)